ComfyUI的强大之处不仅在于其灵活的节点系统,更在于庞大的自定义节点生态。然而,手动管理这些节点插件往往让人头疼:下载、安装、更新、版本冲突等问题层出不穷。ComfyUI Manager的出现完美解决了这些痛点。
ComfyUI Manager是一个专门用于管理ComfyUI自定义节点的插件工具,它提供了图形化界面来浏览、安装、更新和卸载各种节点插件。有了它,你可以像使用应用商店一样轻松管理ComfyUI的扩展功能。
重点内容:ComfyUI Manager的安装流程、插件浏览与安装、节点更新管理、以及常见问题的解决方案。
ComfyUI Manager 概述与作用
ComfyUI Manager是由社区开发的一个插件管理器,它大大简化了ComfyUI自定义节点的管理流程。
🎯 ComfyUI Manager 的核心功能
| 功能模块 | 核心特性 | 应用价值 | 推荐指数 |
|---|---|---|---|
| 节点浏览 | 可视化浏览所有可用节点 | 快速发现有用的扩展 | ⭐⭐⭐⭐⭐ |
| 一键安装 | GUI界面直接安装节点 | 无需手动下载配置 | ⭐⭐⭐⭐⭐ |
| 版本管理 | 自动处理依赖和更新 | 避免版本冲突问题 | ⭐⭐⭐⭐ |
| 批量操作 | 批量安装/更新/卸载 | 提高管理效率 | ⭐⭐⭐⭐⭐ |
🔥 ComfyUI Manager vs 手动管理
| 对比项目 | 手动管理 | ComfyUI Manager | 优势 |
|---|---|---|---|
| 安装节点 | 下载、解压、配置 | 一键安装 | 操作简化95% |
| 依赖处理 | 手动解决冲突 | 自动处理 | 避免环境问题 |
| 更新维护 | 逐个检查更新 | 批量更新 | 节省时间精力 |
| 节点发现 | 搜索GitHub | 内置浏览器 | 资源整合 |
| 卸载清理 | 手动删除文件 | 完全卸载 | 避免残留 |
ComfyUI Manager 安装前准备
在开始ComfyUI Manager安装之前,确保你的环境满足以下要求:
📋 环境要求检查
| 检查项目 | 要求 | 检查命令 | 备注 |
|---|---|---|---|
| ComfyUI | 已正常安装运行 | python main.py |
必须先安装ComfyUI |
| Git | 已安装Git工具 | git --version |
用于下载节点源码 |
| 网络连接 | 可访问GitHub | ping github.com |
下载节点需要网络 |
| 磁盘空间 | 至少2GB可用空间 | df -h (Linux/Mac) |
节点文件占用空间 |
🔧 安装前环境验证
# 验证ComfyUI是否正常运行
cd /path/to/ComfyUI
python main.py --cpu

# 检查Git是否可用
git --version

# 测试GitHub连接
git ls-remote https://github.com/ltdrdata/ComfyUI-Manager.git
ComfyUI Manager 安装步骤详解
🚀 方法一:Git克隆安装(推荐)
这是最常用也是最可靠的安装方式:
# 1. 进入ComfyUI目录
cd /path/to/ComfyUI

# 2. 进入custom_nodes目录
cd custom_nodes

# 3. 克隆ComfyUI Manager
git clone https://github.com/ltdrdata/ComfyUI-Manager.git

# 4. 安装依赖
cd ComfyUI-Manager
pip install -r requirements.txt

# 5. 重启ComfyUI
cd ../..
python main.py
📥 方法二:直接下载安装
如果没有Git环境,可以直接下载:
# 下载最新版本
curl -L https://github.com/ltdrdata/ComfyUI-Manager/archive/refs/heads/main.zip -o manager.zip

# 解压到custom_nodes目录
unzip manager.zip -d custom_nodes/
mv custom_nodes/ComfyUI-Manager-main custom_nodes/ComfyUI-Manager

# 安装依赖
cd custom_nodes/ComfyUI-Manager
pip install -r requirements.txt
🐳 方法三:Docker环境安装
对于Docker用户:
# 在Dockerfile中添加
RUN cd /comfyui/custom_nodes && \
    git clone https://github.com/ltdrdata/ComfyUI-Manager.git && \
    cd ComfyUI-Manager && \
    pip install -r requirements.txt
✅ 安装验证
安装完成后,重启ComfyUI,你应该能看到:
- 界面变化:右侧面板出现"Manager"按钮
- 菜单选项:右键菜单增加管理相关选项
- 日志信息:启动日志显示Manager加载成功
# 验证安装的Python脚本
import os
import sys

def verify_manager_installation():
    """验证ComfyUI Manager是否正确安装"""

    # 检查Manager目录
    manager_path = "custom_nodes/ComfyUI-Manager"
    if not os.path.exists(manager_path):
        print("❌ ComfyUI Manager目录不存在")
        return False

    # 检查关键文件
    key_files = [
        "custom_nodes/ComfyUI-Manager/__init__.py",
        "custom_nodes/ComfyUI-Manager/manager.py",
        "custom_nodes/ComfyUI-Manager/requirements.txt"
    ]

    for file_path in key_files:
        if not os.path.exists(file_path):
            print(f"❌ 关键文件缺失: {file_path}")
            return False

    print("✅ ComfyUI Manager安装验证通过")
    return True

if __name__ == "__main__":
    verify_manager_installation()
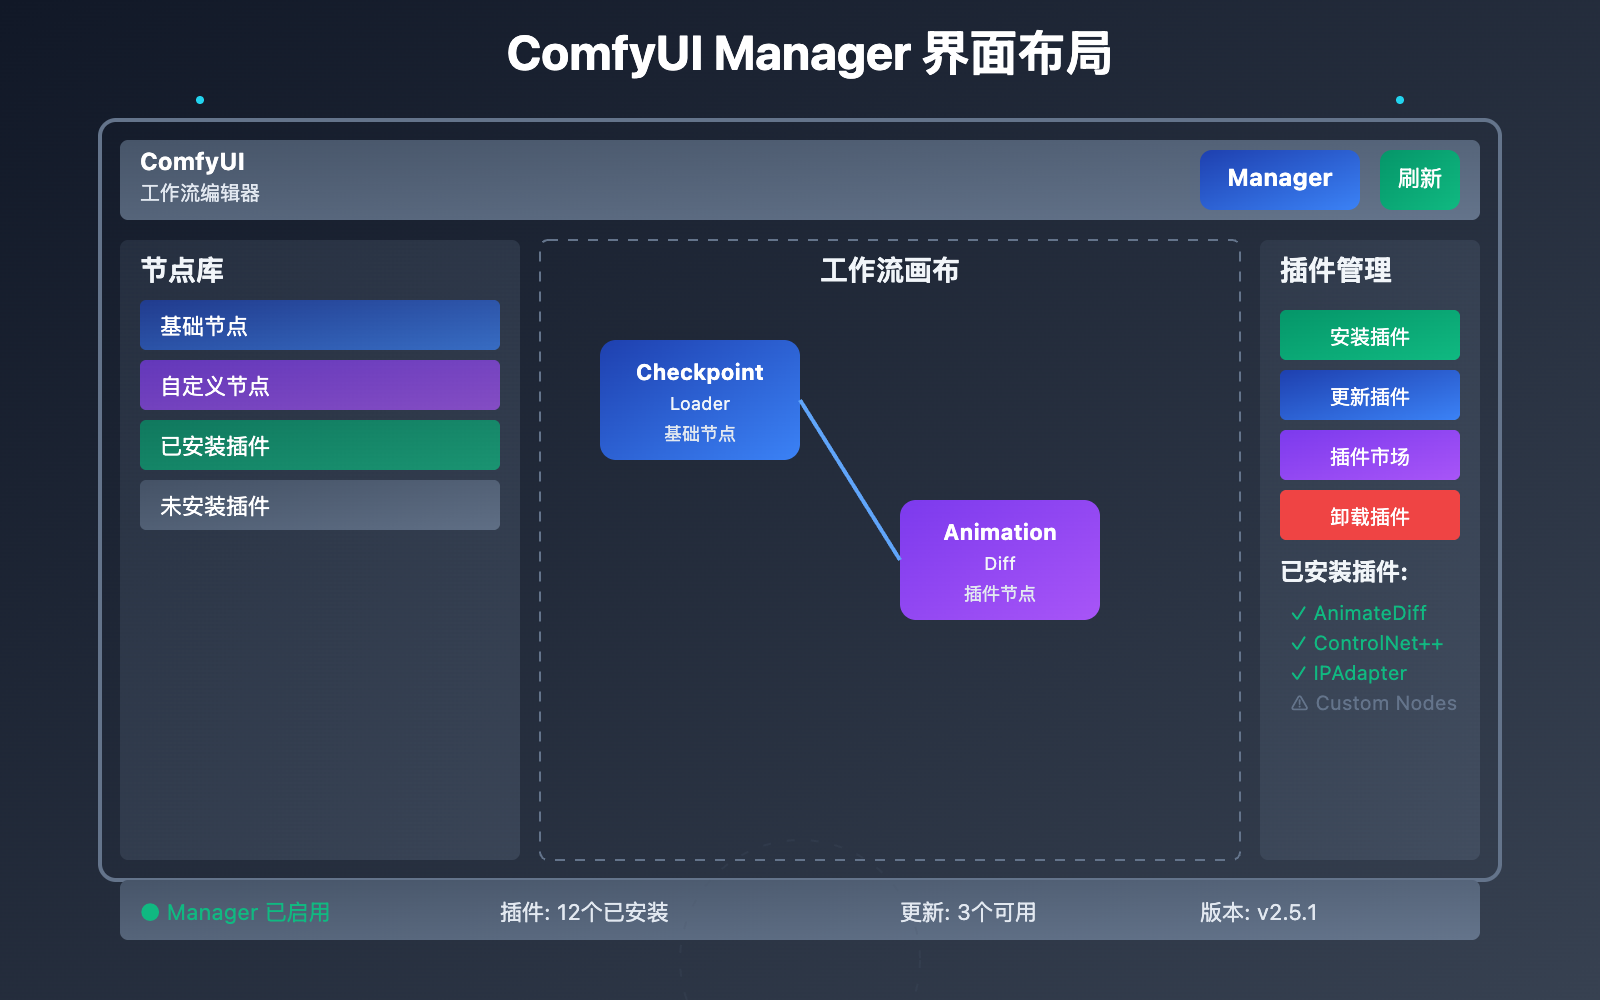
ComfyUI Manager 界面操作指南
🎮 Manager 界面布局
成功安装后,ComfyUI Manager会在界面中添加以下元素:
| 界面元素 | 位置 | 功能说明 |
|---|---|---|
| Manager按钮 | 右侧工具栏 | 打开管理界面 |
| Install Custom Nodes | Manager菜单 | 浏览安装节点 |
| Install Models | Manager菜单 | 下载模型文件 |
| Update ComfyUI | Manager菜单 | 更新ComfyUI本体 |
| Update Custom Nodes | Manager菜单 | 批量更新节点 |
📦 节点安装操作流程
步骤1:打开节点浏览器
# 启动ComfyUI后
# 1. 点击右侧"Manager"按钮
# 2. 选择"Install Custom Nodes"
# 3. 等待节点列表加载完成
步骤2:浏览和搜索节点
在节点浏览器中,你可以:
- 分类浏览:按功能分类查看节点
- 关键词搜索:输入关键词快速定位
- 按热度排序:查看最受欢迎的节点
- 查看详情:了解节点功能和使用方法
步骤3:安装选定节点
# 安装节点的内部流程(Manager自动执行)
def install_custom_node(node_info):
    """安装自定义节点的流程"""

    # 1. 检查依赖环境
    check_dependencies(node_info.requirements)

    # 2. 下载节点源码
    download_from_git(node_info.git_url)

    # 3. 安装Python依赖
    install_requirements(node_info.requirements_file)

    # 4. 注册节点到ComfyUI
    register_nodes(node_info.node_classes)

    # 5. 更新节点映射
    update_node_mapping()

    return "Installation completed"
🔄 节点更新与维护
批量更新节点
# 通过Manager界面批量更新
# 1. 点击"Update Custom Nodes"
# 2. 选择要更新的节点(或全选)
# 3. 点击"Update Selected"
# 4. 等待更新完成并重启ComfyUI
检查更新状态
Manager提供了详细的更新状态信息:
| 状态标识 | 含义 | 建议操作 |
|---|---|---|
| 🟢 Up to date | 已是最新版本 | 无需操作 |
| 🟡 Update available | 有可用更新 | 建议更新 |
| 🔴 Update failed | 更新失败 | 检查网络或依赖 |
| ⚪ Not installed | 未安装 | 可选择安装 |
ComfyUI Manager 高级功能
🎯 模型文件管理
ComfyUI Manager不仅管理节点,还能管理模型文件:
# 通过API方式管理模型(示例)
import requests
import json

def download_model_via_api(model_info):
    """通过API下载模型文件"""

    # 构建下载请求
    download_request = {
        "model_name": model_info["name"],
        "model_url": model_info["download_url"],
        "model_type": model_info["type"],  # checkpoint, lora, embedding等
        "target_path": f"models/{model_info['type']}/"
    }

    # 如果使用云端API服务,可以预先下载常用模型
    response = requests.post(
        "https://vip.apiyi.com/v1/comfyui/download-model",
        json=download_request,
        headers={"Authorization": "Bearer your_api_key"}
    )

    return response.json()
🔧 自定义节点开发支持
Manager还支持开发者功能:
| 开发功能 | 用途 | 使用场景 |
|---|---|---|
| 节点模板 | 快速创建节点骨架 | 自定义节点开发 |
| 依赖检查 | 验证节点依赖完整性 | 节点发布前测试 |
| 打包发布 | 生成节点发布包 | 分享给社区 |
| 调试模式 | 节点运行时调试 | 问题排查 |
📊 使用统计与监控
# Manager使用统计脚本
def get_manager_stats():
    """获取Manager使用统计"""

    import json
    import os
    from datetime import datetime

    stats = {
        "installed_nodes": 0,
        "last_update": None,
        "popular_nodes": [],
        "installation_history": []
    }

    # 统计已安装节点
    custom_nodes_dir = "custom_nodes"
    if os.path.exists(custom_nodes_dir):
        dirs = [d for d in os.listdir(custom_nodes_dir)
                if os.path.isdir(os.path.join(custom_nodes_dir, d))]
        stats["installed_nodes"] = len(dirs)

    # 读取使用历史
    history_file = "custom_nodes/ComfyUI-Manager/history.json"
    if os.path.exists(history_file):
        with open(history_file, 'r') as f:
            history = json.load(f)
            stats["installation_history"] = history.get("installations", [])

    return stats

# 使用示例
stats = get_manager_stats()
print(f"已安装节点数量: {stats['installed_nodes']}")
ComfyUI Manager 常见问题解决
🚨 安装失败排查
问题1:Manager按钮不显示
# 排查步骤
# 1. 检查Manager目录是否存在
ls -la custom_nodes/ComfyUI-Manager

# 2. 检查Python依赖
cd custom_nodes/ComfyUI-Manager
pip install -r requirements.txt

# 3. 检查ComfyUI日志
python main.py 2>&1 | grep -i manager

# 4. 手动重新安装
rm -rf custom_nodes/ComfyUI-Manager
git clone https://github.com/ltdrdata/ComfyUI-Manager.git custom_nodes/ComfyUI-Manager
问题2:节点安装失败
| 错误类型 | 常见原因 | 解决方案 |
|---|---|---|
| 网络超时 | GitHub访问受限 | 使用代理或镜像源 |
| 依赖冲突 | Python包版本冲突 | 创建独立虚拟环境 |
| 权限问题 | 文件写入权限不足 | 检查目录权限 |
| 磁盘空间 | 存储空间不足 | 清理无用文件 |
问题3:节点更新失败
# 修复更新失败的脚本
def fix_update_issues():
    """修复节点更新问题"""

    import subprocess
    import os

    # 1. 清理Git缓存
    os.system("git gc --prune=now")

    # 2. 重置Git状态
    custom_nodes_dir = "custom_nodes"
    for node_dir in os.listdir(custom_nodes_dir):
        node_path = os.path.join(custom_nodes_dir, node_dir)
        if os.path.isdir(node_path) and os.path.exists(os.path.join(node_path, ".git")):
            print(f"重置 {node_dir}...")
            os.chdir(node_path)
            os.system("git reset --hard HEAD")
            os.system("git clean -fd")
            os.chdir("../..")

    # 3. 重新安装Manager
    manager_path = os.path.join(custom_nodes_dir, "ComfyUI-Manager")
    if os.path.exists(manager_path):
        os.chdir(manager_path)
        os.system("pip install -r requirements.txt --upgrade")
        os.chdir("../..")

    print("修复完成,请重启ComfyUI")

if __name__ == "__main__":
    fix_update_issues()
🔧 性能优化建议
节点管理最佳实践
# 节点管理优化脚本
def optimize_node_management():
    """优化节点管理性能"""

    # 1. 定期清理无用节点
    def cleanup_unused_nodes():
        """清理未使用的节点"""
        # 分析工作流使用情况
        # 标记未使用的节点
        # 提示用户是否删除
        pass

    # 2. 批量更新优化
    def batch_update_nodes():
        """批量更新节点(并发处理)"""
        import threading
        import queue

        update_queue = queue.Queue()

        def update_worker():
            while True:
                node_info = update_queue.get()
                if node_info is None:
                    break
                # 执行更新操作
                update_single_node(node_info)
                update_queue.task_done()

        # 启动多个更新线程
        threads = []
        for i in range(3):  # 3个并发更新
            t = threading.Thread(target=update_worker)
            t.start()
            threads.append(t)

    # 3. 依赖缓存优化
    def cache_dependencies():
        """缓存常用依赖包"""
        # 分析常用依赖
        # 预下载到本地缓存
        # 加速后续安装
        pass

    return {
        "cleanup": cleanup_unused_nodes,
        "batch_update": batch_update_nodes,
        "cache_deps": cache_dependencies
    }
ComfyUI Manager API 集成
对于需要自动化管理的用户,可以通过API方式操作:
💻 API调用示例
import requests
import json

class ComfyUIManagerAPI:
    def __init__(self, base_url="http://localhost:8188"):
        self.base_url = base_url

    def list_available_nodes(self):
        """获取可用节点列表"""
        response = requests.get(f"{self.base_url}/manager/nodes")
        return response.json()

    def install_node(self, node_name):
        """安装指定节点"""
        data = {"node_name": node_name}
        response = requests.post(f"{self.base_url}/manager/install", json=data)
        return response.json()

    def update_all_nodes(self):
        """更新所有节点"""
        response = requests.post(f"{self.base_url}/manager/update-all")
        return response.json()

    def get_node_status(self, node_name):
        """获取节点状态"""
        response = requests.get(f"{self.base_url}/manager/status/{node_name}")
        return response.json()

# 使用示例
manager_api = ComfyUIManagerAPI()

# 获取可用节点
nodes = manager_api.list_available_nodes()
print(f"可用节点数量: {len(nodes)}")

# 安装热门节点
popular_nodes = ["ComfyUI-Impact-Pack", "ComfyUI-AnimateDiff-Evolved"]
for node in popular_nodes:
    result = manager_api.install_node(node)
    print(f"安装 {node}: {result['status']}")
🔄 与云端API结合
# 结合云端API的节点管理
def hybrid_node_management():
    """混合云端API的节点管理策略"""

    # 1. 本地轻量级节点
    local_nodes = [
        "basic-image-processing",
        "simple-text-nodes",
        "utility-nodes"
    ]

    # 2. 云端计算密集型节点
    cloud_api_endpoints = {
        "controlnet": "https://vip.apiyi.com/v1/comfyui/controlnet",
        "upscale": "https://vip.apiyi.com/v1/comfyui/upscale",
        "animation": "https://vip.apiyi.com/v1/comfyui/animation"
    }

    def process_workflow(workflow_data):
        """智能分发工作流处理"""

        # 分析工作流节点类型
        for node_id, node_data in workflow_data.items():
            node_type = node_data.get("class_type")

            if node_type in ["ControlNetApply", "ControlNetPreprocessor"]:
                # 使用云端ControlNet API
                result = requests.post(
                    cloud_api_endpoints["controlnet"],
                    json=node_data,
                    headers={"Authorization": "Bearer your_api_key"}
                )
                # 处理返回结果

            elif node_type in local_nodes:
                # 本地处理
                result = process_local_node(node_data)

        return result

    return process_workflow
❓ ComfyUI Manager 常见问题
Q1: Manager界面显示空白,没有可用节点怎么办?
这通常是网络连接问题导致的节点列表加载失败:
# 1. 检查网络连接
ping github.com

# 2. 测试API连接
curl -I https://api.github.com/repos/ltdrdata/ComfyUI-Manager-nodes/contents

# 3. 使用代理(如果需要)
export https_proxy=http://your-proxy:port
export http_proxy=http://your-proxy:port

# 4. 手动更新节点列表
cd custom_nodes/ComfyUI-Manager
python update_nodes_list.py

# 5. 检查Manager配置
cat config.ini
如果网络环境受限,建议使用云端API服务,比如API易等平台提供的ComfyUI接口,避免本地网络问题。
Q2: 安装节点后ComfyUI启动失败怎么办?
节点冲突是常见问题,解决方案:
# 节点冲突诊断脚本
def diagnose_node_conflicts():
    """诊断节点冲突问题"""

    import os
    import sys
    import traceback

    # 1. 逐个测试节点
    custom_nodes_dir = "custom_nodes"
    problem_nodes = []

    for node_dir in os.listdir(custom_nodes_dir):
        node_path = os.path.join(custom_nodes_dir, node_dir)
        if os.path.isdir(node_path):
            try:
                # 尝试导入节点
                sys.path.append(node_path)
                __import__(node_dir)
                print(f"✅ {node_dir} 正常")
            except Exception as e:
                print(f"❌ {node_dir} 有问题: {str(e)}")
                problem_nodes.append(node_dir)

    # 2. 生成修复建议
    if problem_nodes:
        print("\n修复建议:")
        for node in problem_nodes:
            print(f"- 暂时禁用 {node}: mv custom_nodes/{node} custom_nodes/{node}.disabled")

    return problem_nodes

# 运行诊断
diagnose_node_conflicts()
Q3: 如何批量安装常用的ComfyUI节点?
可以创建一个批量安装脚本:
def batch_install_essential_nodes():
    """批量安装必备节点"""

    # 推荐的必备节点列表
    essential_nodes = [
        "ComfyUI-Manager",
        "ComfyUI-Impact-Pack",
        "ComfyUI-AnimateDiff-Evolved",
        "ComfyUI-Advanced-ControlNet",
        "ComfyUI-Inspire-Pack",
        "ComfyUI-Custom-Scripts",
        "ComfyUI-Efficiency-Nodes"
    ]

    # 安装命令模板
    install_commands = []
    for node in essential_nodes:
        cmd = f"cd custom_nodes && git clone https://github.com/repo/{node}.git"
        install_commands.append(cmd)

    # 生成安装脚本
    script_content = "#!/bin/bash\n"
    script_content += "echo '开始批量安装ComfyUI节点...'\n"

    for cmd in install_commands:
        script_content += f"{cmd}\n"
        script_content += f"cd {node} && pip install -r requirements.txt\n"
        script_content += "cd ..\n"

    script_content += "echo '批量安装完成,请重启ComfyUI'\n"

    # 保存脚本
    with open("batch_install_nodes.sh", "w") as f:
        f.write(script_content)

    print("批量安装脚本已生成: batch_install_nodes.sh")
    print("运行: chmod +x batch_install_nodes.sh && ./batch_install_nodes.sh")

# 生成脚本
batch_install_essential_nodes()
📚 延伸阅读与进阶使用
🛠️ 节点开发资源
| 资源类型 | 推荐内容 | 获取方式 |
|---|---|---|
| 开发文档 | ComfyUI节点开发指南 | https://github.com/comfyanonymous/ComfyUI/blob/master/CONTRIBUTING.md |
| 社区资源 | 节点开发模板 | GitHub搜索 comfyui-node-template |
| API文档 | Manager API接口说明 | https://help.apiyi.com/comfyui-manager |
| 视频教程 | 节点开发实战 | YouTube、B站技术频道 |
🔗 相关工具
| 工具名称 | 功能说明 | 使用场景 |
|---|---|---|
| ComfyUI-Impact-Pack | AI图像处理增强 | 专业后处理 |
| ComfyUI-AnimateDiff | 动画生成 | 视频制作 |
| ComfyUI-ControlNet | 精确控制生成 | 专业设计 |
| ComfyUI-Inspire-Pack | 创意工具集 | 艺术创作 |
🎯 总结与最佳实践
ComfyUI Manager是ComfyUI生态中不可或缺的工具,它将复杂的节点管理变得简单直观。掌握Manager的使用技巧,能够大幅提升你的ComfyUI使用效率。
核心要点回顾:
- 正确安装:确保Git环境和网络连接正常
- 合理使用:按需安装节点,避免冗余和冲突
- 定期维护:及时更新节点,清理无用扩展
- 问题排查:掌握常见问题的诊断和解决方法
最佳实践建议:
- 新手用户:先安装几个基础节点,逐步扩展
- 进阶用户:建立自己的常用节点清单,批量管理
- 专业用户:结合云端API,实现本地+云端的混合架构
- 开发者:参与社区贡献,开发和分享自定义节点
通过合理使用ComfyUI Manager,配合云端API服务的支持,可以构建一个既强大又稳定的AI图像生成工作环境。
📝 作者简介:资深ComfyUI用户,专注节点生态研究和插件开发。定期分享Manager使用技巧和节点推荐,搜索"API易"可找到更多ComfyUI管理和优化方案。
🔔 技术交流:欢迎在评论区分享你的节点管理经验,一起完善ComfyUI社区生态。